
[Exploit Tech Analysis][Heap] Double Free
heap에 대한 기초 지식이 필요합니다.
(chunk, bin, tcache 등)
Double Free는 청크를 두 번 연달아 해제할 때 발생한다. 이렇게 해제되면 같은 크기의 청크를 연속으로 할당받으면 같은 청크가 두 번 연달아 할당되기 때문에,
먼저 할당한 청크로 fd필드와 bk필드를 조작해 두 번째 청크를 할당받을 때 임의 주소를 할당받을 수 있고, 이를 통해 AAW나 AAR 프리미티브를 만들 수 있다.
1. Mitigation
이렇게 double free를 막기 위해 ptmalloc는 여러 검사를 수행하는데, free()시 어디에 들어가냐에 따라 검사가 달라진다.
1-1. bin
일반적으로 bin에 들어가는 청크의 경우, 다음과 같은 검사를 수행한다.
// Def. in /malloc/malloc.c, line 4685 (@glibc-2.41)

static void
_int_free_merge_chunk (mstate av, mchunkptr p, INTERNAL_SIZE_T size)
{
	...
  if (__glibc_unlikely (!prev_inuse(nextchunk)))
    malloc_printerr ("double free or corruption (!prev)");
  ...
}
이는 다음 청크의 P(prev_in_use)를 검사한다. 일반적인 경우라면 이 시점에서 다음 청크의 P는 1이어야 한다.
그러나 만약 다음 청크의 P가 0이라면 자신은 사용 중이 아니므로 이미 해제되었다는 뜻이고, 따라서 double free 상황으로 생각할 수 있게 된다.
1-2. tcache
tcache에 들어가는 청크에 대해서는 다음과 같은 검사를 수행한다.
// Def. in /malloc/malloc.c, line 3248 (@glibc-2.41)
static inline bool
tcache_free (mchunkptr p, INTERNAL_SIZE_T size)
{
	...
   /* This test succeeds on double free.  However, we don't 100%
	 trust it (it also matches random payload data at a 1 in
	 2^<size_t> chance), so verify it's not an unlikely
	 coincidence before aborting.  */
      if (__glibc_unlikely (e->key == tcache_key))
				tcache_double_free_verify (e, tc_idx);
		...
}
위처럼 해제 대상인 청크 e에 대해 e->key값이 tcache_key와 같다면 tcache_double_free_verify()를 통해 확인한 후 프로세스를 강제로 종료시킨다.
e->key 값은 다음과 같이 tcache에 청크를 넣는 함수인 tcache_put()이 관리한다.
// Def. in /malloc/malloc.c, line 3158 (@glibc-2.41)

static __always_inline void
tcache_put (mchunkptr chunk, size_t tc_idx)
{
  tcache_entry *e = (tcache_entry *) chunk2mem (chunk);

  /* Mark this chunk as "in the tcache" so the test in _int_free will
     detect a double free.  */
  e->key = tcache_key;
	...
}
2. Bypass
2-1. bin
Heap Overflow가 가능하다면, bin에 들어가는 청크에 대해서는 비교적 쉽게 우회가 가능하다.
다음 청크의 P만 조작해 1로 만들어 주면 되기 때문이다. 예를 들어,
#include <stdio.h>
#include <stdlib.h>

int main() {
    char *chunk1 = malloc(0x500);  // unsorted bin
    char *chunk2 = malloc(0x500);

    free(chunk1);                              // 여기서 chunk2의 P는 0이 됨
    *(unsigned long *)(chunk2 - 0x8) = 0x511;  // 다시 chunk2의 P를 1로 맞춰줌
    free(chunk1);

    return 0;
}
위 코드를 실행하면 아무 오류 없이 실행되는 것을 볼 수 있다. 그러나 double free후 다음과 같이 unsorted bin에서 할당받는 순간 오류가 일어난다.
#include <stdio.h>
#include <stdlib.h>

int main() {
    char *chunk1 = malloc(0x500);
    char *chunk2 = malloc(0x500);

    free(chunk1);
    *(unsigned long *)(chunk2 - 0x8) = 0x511;
    free(chunk1);

    char *chunk3 = malloc(0x500);  // 오류!

    return 0;
}
 ~$ ./bin_test
malloc(): unsorted double linked list corrupted
[1]    304185 IOT instruction (core dumped)  ./test
이는 _int_malloc()에서 검사하는
if (__glibc_unlikely (bck->fd != victim)
    || __glibc_unlikely (victim->fd != unsorted_chunks (av)))
  malloc_printerr ("malloc(): unsorted double linked list corrupted");
조건을 위배하기 때문이다.
unsorted bin은 FIFO를 따르기 때문에 항상 unsorted bin에서 나가는 청크인 victim의 fd는 bin에 연결되어 있어야 한다.
그러나 위처럼 double free를 하면 chunk1의 fd와 bk 모두 자신을 가리키게 된다.
이를 이해하기 위해 unsorted bin에 청크를 넣는 역할을 하는 _int_free_create_chunk() 함수를 살펴보면
// Def. in /malloc/malloc.c, line 4752 (@glibc-2.41)

static INTERNAL_SIZE_T
_int_free_create_chunk (mstate av, mchunkptr p, INTERNAL_SIZE_T size,
			mchunkptr nextchunk, INTERNAL_SIZE_T nextsize)
{
      if (!in_smallbin_range (size))
        {
          ...
          bck = unsorted_chunks (av);
          fwd = bck->fd;
          ...
        }

      p->bk = bck;
      p->fd = fwd;
      bck->fd = p;
      fwd->bk = p;
      ...
}
다음과 같은 작업을 수행하고 있음을 알 수 있다.
- 대상 청크
p에 대해,p->bk를bin으로 설정함 p->fd를 앞의 청크인fwd로 설정함bin->fd를p로 설정함fwd->bk를p로 설정함
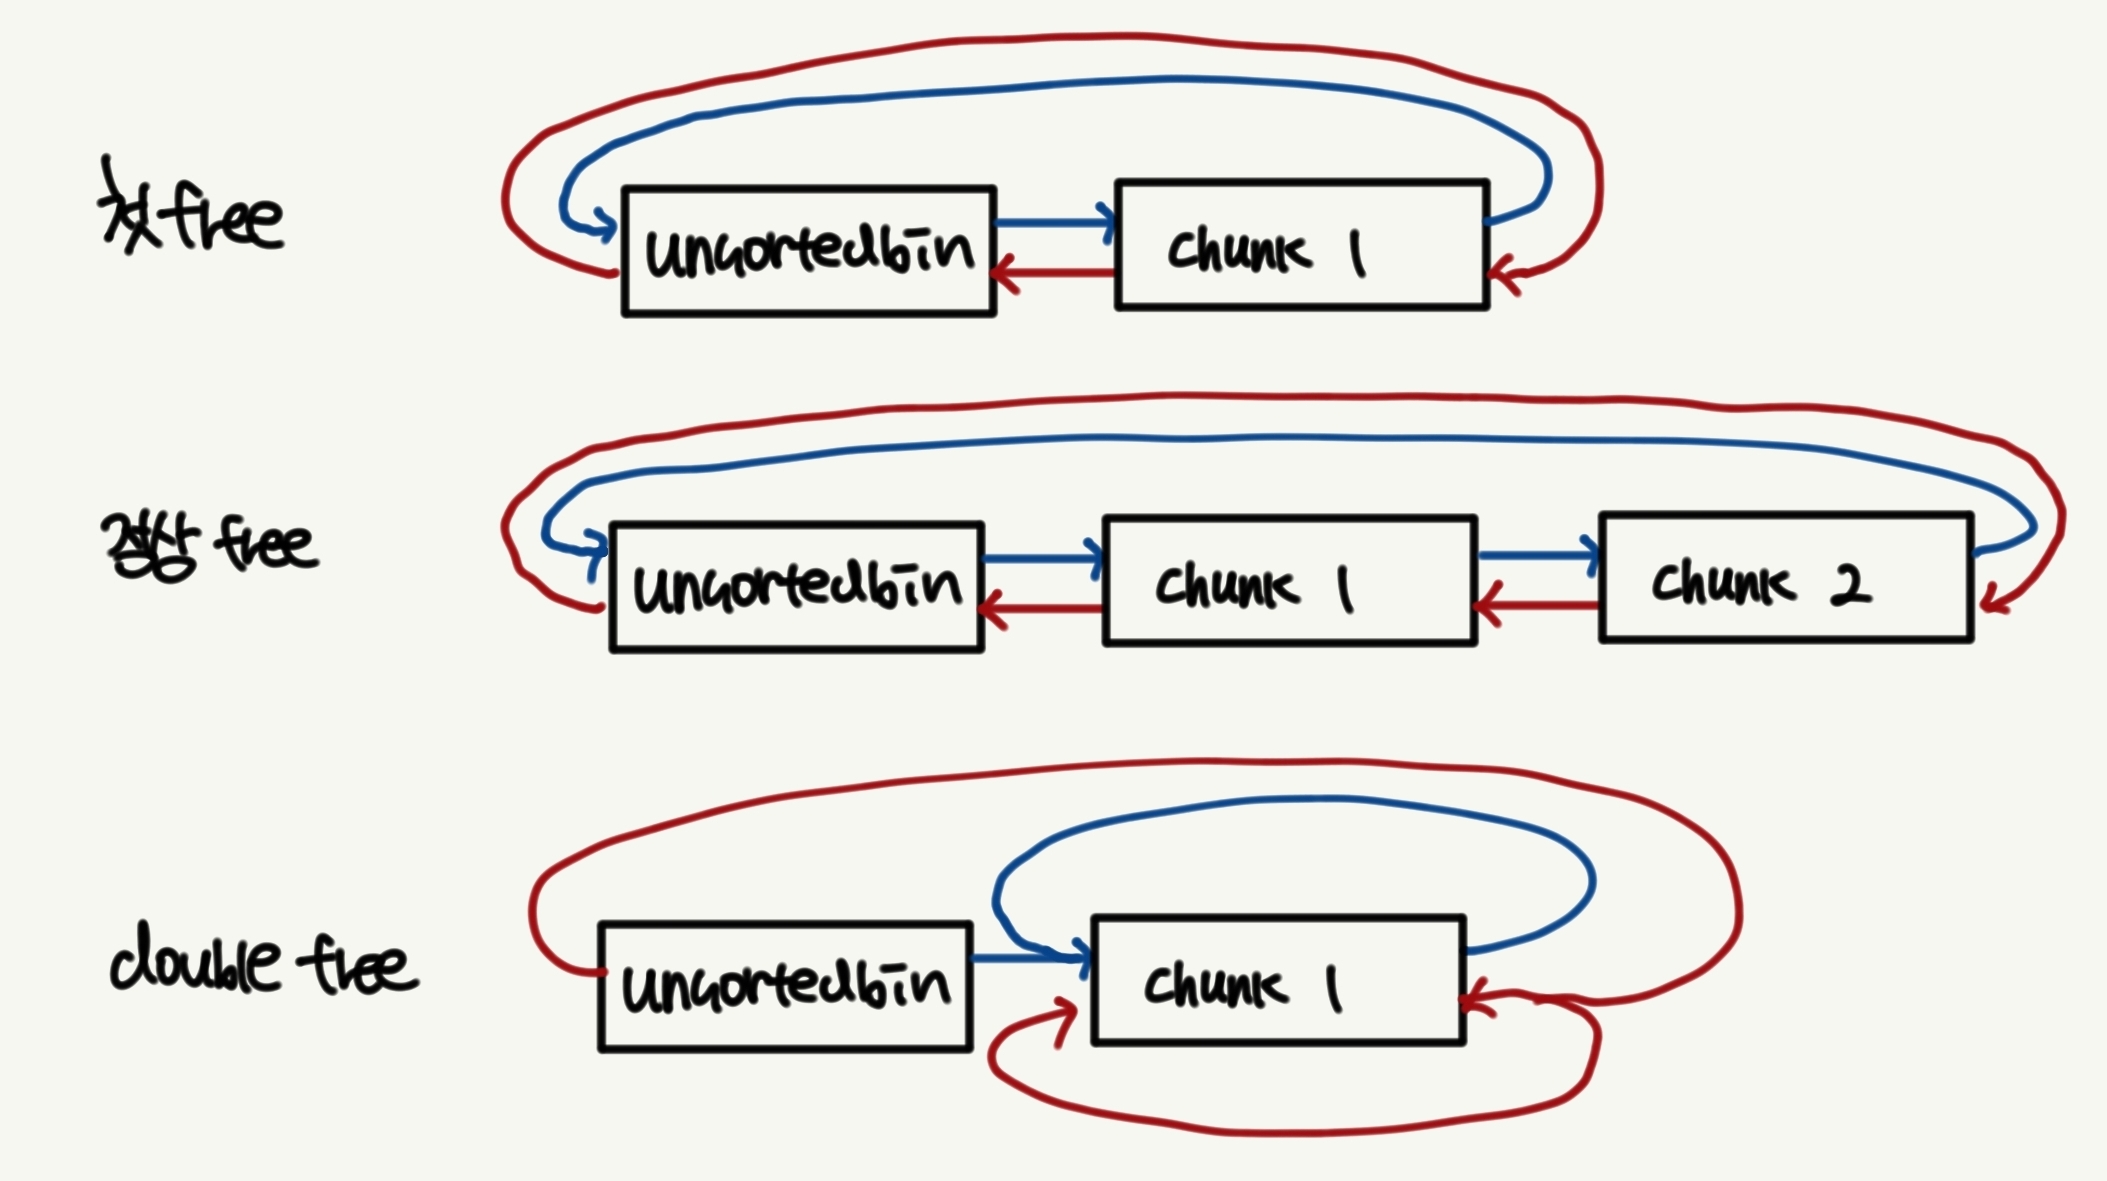
예를 들어 unsorted bin에 chunk1이 이미 있는 상황에서 chunk2가 추가되는 상황을 보자. chunk2를 추가하기 위해서는
chunk2->bk가bin로 설정됨chunk2->fd가chunk1로 설정됨bin->fd가chunk2로 설정됨chunk1->bk가chunk2로 설정됨
과 같은 과정을 거친다(밑 그림의 정상 free 상황을 참고하자).
그러나 만약 double free로 인해 chunk2가 추가되는 것이 아니라 chunk1이 추가되는 상황이라면, 다음과 같은 일이 벌어질 것이다.
chunk1->bk가bin로 설정됨chunk1->fd가chunk1로 설정됨bin->fd가chunk1로 설정됨chunk1->bk가chunk1로 설정됨
이 과정으로 인해 chunk1은 자기 앞 원소와 뒷 원소가 모두 자기 자신을 가리키고 있는 상황이 만들어진다(밑 그림의 double free 상황을 참고하자).
다시 조건을 검사하는 시점으로 돌아오자. 조건에서 victim은 bin에서 나가려는 청크이며, bck는 victim->bk이다.
이때 bck가 결국 자기 자신이므로 bck->fd == victim은 만족한다. 그러나 victim->fd도 자기 자신이므로
victim->fd == unsorted_chunks (av)조건을 위배하게 된다.
만약 victim->fd != unsorted_chunks (av) 조건을 만족시키기 위해 UAF를 통해 fd를 bin에 연결한다 하더라도,
bck->fd != victim 조건에서 bck는 victim→bk이므로 여전히 자기 자신이다. 따라서 자신의 fd는 victim이 아닌 bin이므로
두 조건을 동시에 만족시키는 것은 불가능하다. 즉 bin에서 double free까지는 쉽게 가능하지만, 이를 통해 공격을 수행하는 것은 불가능하다.
2-2. tcache
tcache에서 일어나는 double free는 간단하게 우회가 가능하고, 실제로 공격에 사용이 가능하다. 위에서 말한 key값을 조금이라도 변조할 수 있다면 검사를 우회할 수 있기 때문이다. 이때 tcache에 들어간 chunk는 다음과 같이 생겼다.
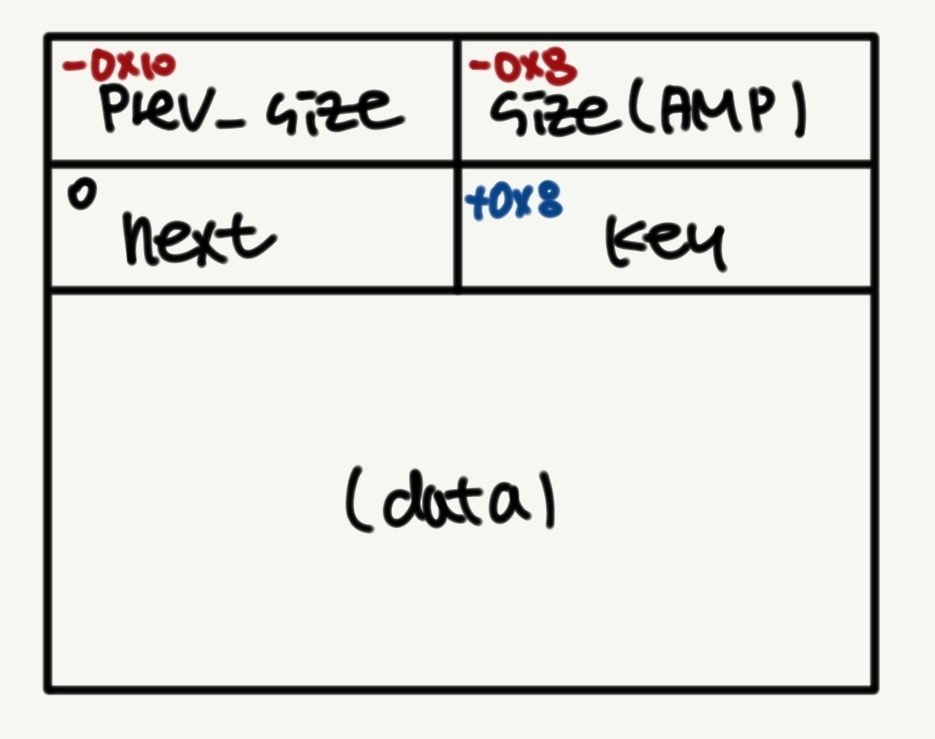
따라서 다음과 같이 key값을 조작하면 충분히 앞에서처럼 double free를 발생시킬 수 있고, 추가로 할당까지 정상적으로 이루어지는 것을 볼 수 있다.
#include <stdio.h>
#include <stdlib.h>

int main() {
    void *chunk1 = malloc(0x40);

    free(chunk1);
    *(unsigned long *)(chunk1 + 0x8) = 0x0;  // 여기서 key를 조작함
    free(chunk1);

    void *chunk2 = malloc(0x40);
    void *chunk3 = malloc(0x40);  // 같은 chunk가 tcache에 2번 들어가 있기 때문에 chunk2 == chunk3임

    printf("chunk2: %p\nchunk3: %p\n", chunk2, chunk3);

    return 0;
}
~$ ./tcache_test
chunk2: 0x55627449e2a0
chunk3: 0x55627449e2a0
Leave a comment